Advanced Internet Mapping System User's Guide
Advanced Internet Mapping System User's Guide
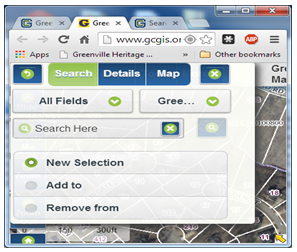
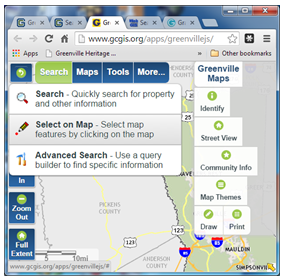
Search
Query the map to find and display information of interest.
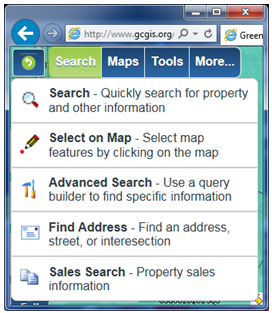
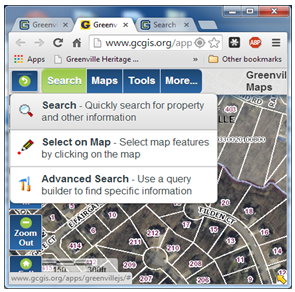
Search – A standard search tool to quickly find property, addresses, roads, subdivisions, schools, post offices, recycling centers, libraries, polling sites, parks, and other map features.
Select on Map – Select map features within a given layer by pointing, drawing a line, drawing a shape (polygon), using the current map view extent, or selecting all features. Additionally, features may be selected using a buffer distance.
Advanced Search – Select, add to an existing selected set, or deselect map features within a given layer using multiple criteria and a set of standard query operators.
Find Address – Find a location using an address or an intersection of two streets.
Sales Search – A search tool to identify and locate properties with similar sales characteristics.
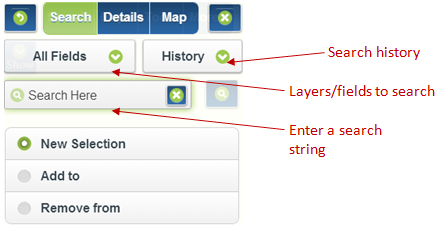
The default search parameters include all searchable fields in all searchable map layers and are recommended in most instances.
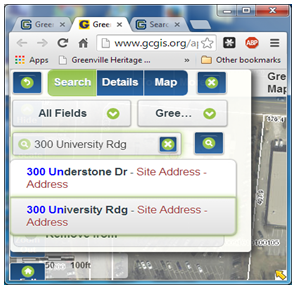
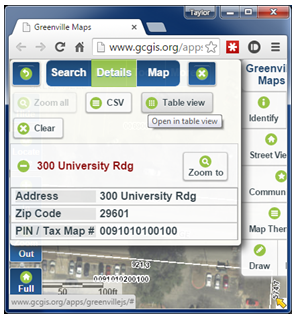
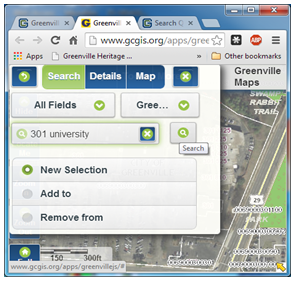
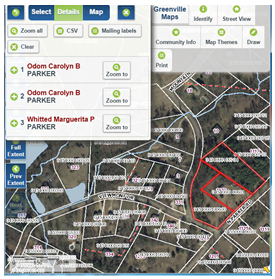
To begin, click in the Search Here text box and begin typing a word or phrase (search string) to search such as a property owner's name, a parcel identification number (PIN), a street address, a subdivision, or a more general term such as “recycle”, or “post office”. The search engine uses predictive text to find and display records as the search string is entered. It is not necessary (or desirable) to completely enter a search string before selecting a record of interest. For example, the complete address, 300 University Ridge, is returned after typing “300 Un” and can be selected from the list with a mouse click or by scrolling down with the arrow keys and pressing enter on the keyboard.
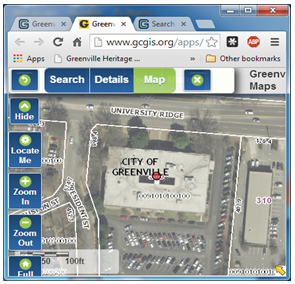
One record is returned displaying descriptive Details and the map zooms to the selected address point.

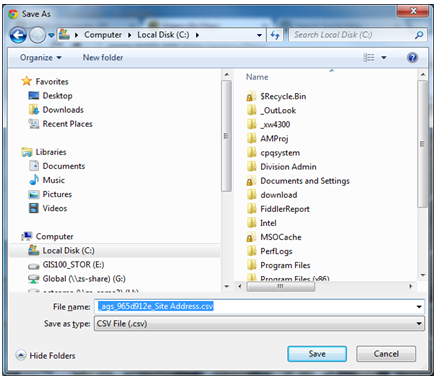
When one or more records are selected, the CSV (comma separated values) file export tool becomes active. This tool will download descriptive information for the selected record(s) to your computer for use in Microsoft Excel or similar software. To do so, click on the CSV button and specify a download location. Click Save.
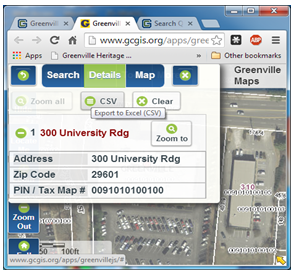
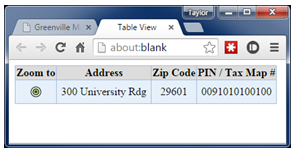
The Table view button opens a new tab with the descriptive details displayed in tabular format. Table view also includes a Zoom to button to quickly zoom to the location of the selected feature.
The Clear button will clear the current search results, including any details displayed and revert to the Search dialog box.
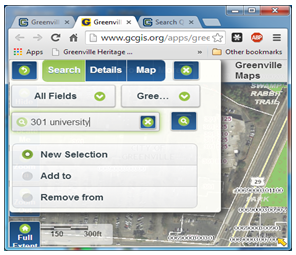
If desired, new features (records) may be selected or added to the current selected set or existing features removed from the current selected set by typing a new search string and clicking on New Selection, Add to, or Remove from. Click on the search icon to apply the new search parameters.
To temporarily display the map under the Search dialog, click the Map button. The Search dialog will minimize but remain active. The search parameters or details of the selected features may be re-displayed by clicking on the respective button.
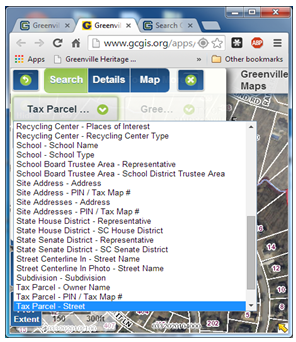
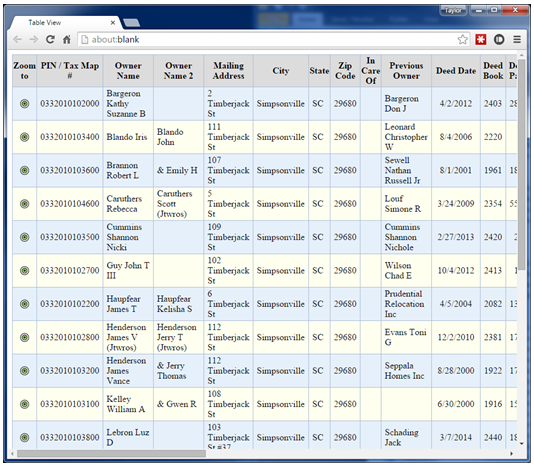
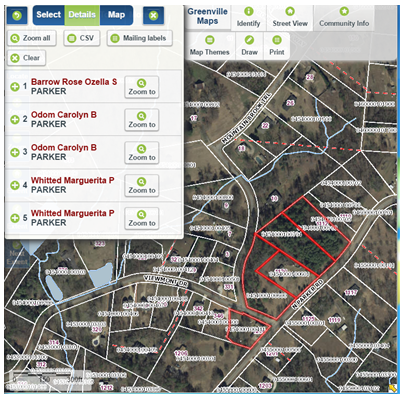
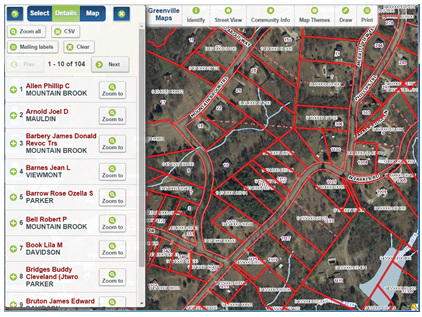
In most instances, the default search parameters are appropriate for a parcel search based on an owner's name or a PIN. In some cases, however, it may be advantageous to specify a single field to query such as the name of the street on which a parcel is located. This approach filters records that may partially match the search string, such as addresses or roads, but are irrelevant to the task at hand. In this example, the objective is to select tax parcels located on Timberjack Street in Simpsonville.
- Click Search from the main menu and then click Search again from the drop down list to open the standard search dialog.
- Click on the All Fields drop-down, scroll down and click on Tax Parcel - Street in the list.
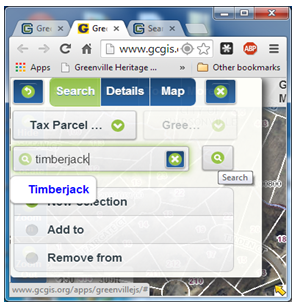
- Click on Search Here, type timberjack in the text box, and press enter on the keyboard or click the
Search icon.
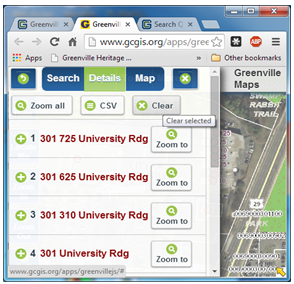
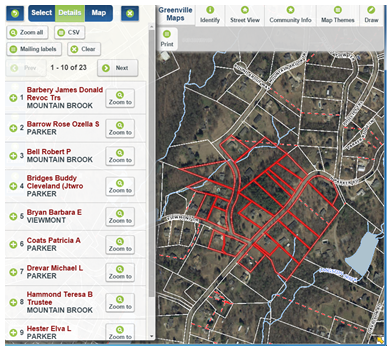
- A list of selected records is displayed and the map refreshes, zooming to the selected parcels and highlighting them in red.

- Several tools are now active and available to operate on the selected set of parcels.
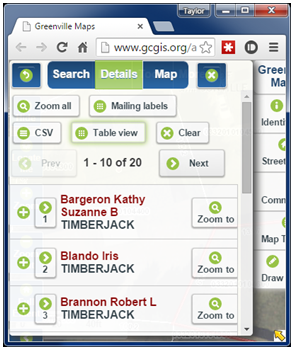
- To display the descriptive Details of any of the selected records, click the plus icon next to a record and expand it. Note, the initial list displays 10 of the 20 selected records. Click Next to display the next 10 records.
- To select an individual record, out of the initial selection of 20 records, click the right arrow icon (next to the plus icon).
- To minimize the Search dialog, click the Map button.
- To exit the Search dialog, click the Close icon.
- Click Zoom all to zoom to the map extents of the selected parcels.
Click CSV to export and download the selected records as a CSV file suitable for use in spreadsheet software such as Microsoft Excel. It is likely the exported PIN/Tax Map Number will either be displayed in scientific notation or will be truncated in the spreadsheet software. Formatting the PIN/Tax Map Number column will correct this problem.
To format the Pin / Tax Map Number column in Microsoft Excel:
Right click on the column Pin / Tax Map # and choose Format Cells...
Under the Category section choose Custom.
In the Type section enter 13 zeros.
Click OK.To format the Pin / Tax Map Number in Libre Office Calc:
In the text import wizard window, under the Fields section, select the Pin / Tax Map # column.
For the column Type choose Text.
Click OK.Note: In some cases, Internet Explorer will open the CSV file in the GIS application window instead of downloading the file. If this is the case, choose File >> Save As from the Internet Explorer menu and specify Text as the format type. Specify a download location and save the file. Due to a Microsoft issue, the Back button will no longer function at this point, requiring the application tab to be closed and the mapping application to be re-opened. This limitation does not exist in Google Chrome or in Firefox.
- Click Table view to open a new tab with the descriptive details displayed in tabular format. Table view includes a Zoom to
button to quickly zoom to the location of the selected feature.
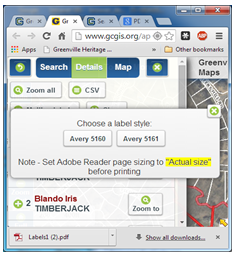
- Click Mailing labels and pick a style, either Avery 5160 or Avery 5161, to create and download a PDF file of labels for the
selected records.
- Click Clear to unselect all records and return to the Search input dialog.
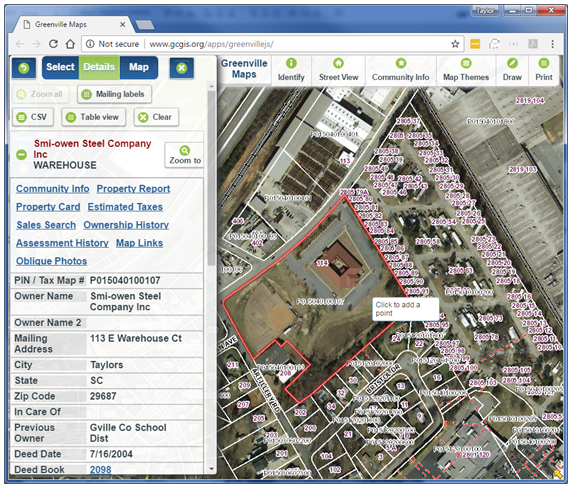
- Expanding a single record activates additional, optional tools applicable only to tax parcels. Click on any of the eight links shown in blue text
to run a tool.
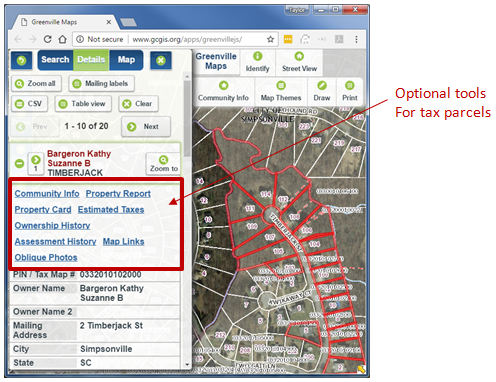
- Community Info – Assembles information describing the "Community" surrounding a specified location
on the map; in this case, the selected tax parcel. The Community Info tool returns a list of descriptive information for the
following categories: Tax Parcel, Zoning, City Limits, Flood Zones, Voter Information, Public Safety, Schools, Places of Interest, and Geodetic
Survey Control. Click on the “plus” icon to expand a category and display details. Optionally, click the Print button to
produce a paper copy of one or more expanded categories.

- Property Report – Creates a high quality report for the selected tax parcel. This is the
standard tool to use when a paper copy of tax parcel information is required. The report includes a map thumbnail along with ownership, deed
and plat references, values, taxes, history and other administrative information. For highest quality output, click the Convert to PDF
link at the top of the first page of the report, download the file and then print it. Optionally, the report may be printed directly from the
browser window (typically right-click-print, if supported by the browser).

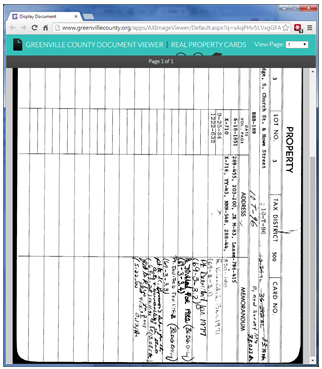
- Property Card – Displays the archived property record card for the selected parcel.
Property Cards were used to track transactions prior to 2003. These documents may be printed using the Print button
at the top of the page or right-click print if supported by the browser.
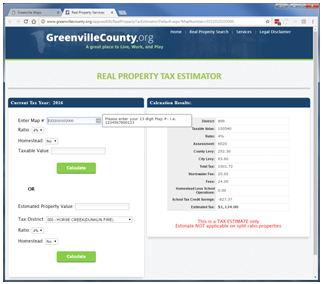
- Estimated Taxes – Opens a new browser window containing the Real Property Tax Estimator webpage
and an estimate of the taxes for the selected property.
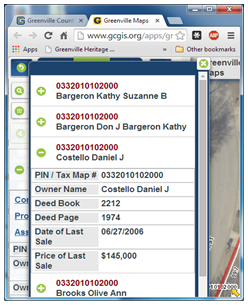
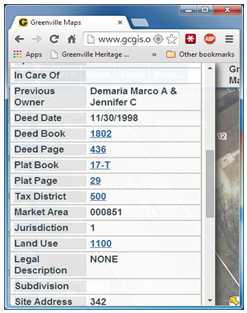
- Ownership History – Displays an expandable, historical list of owners along with deed references,
dates of sale, and sale prices for the selected parcel. This information is included in the Property Report.
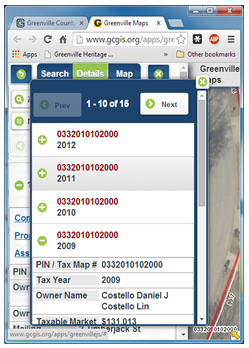
- Assessment History – Displays an expandable list of assessment history from 1998 to the present and
includes assessed values, owner names, taxable market values, and total taxes for the selected parcel. Like Ownership History,
Assessment History is included in the Property Report.
- Map Links – Opens a new browser window with a set of links to Google Maps, Street View, Bing Maps,
Bird’s Eye, and web mapping applications available from surrounding counties.
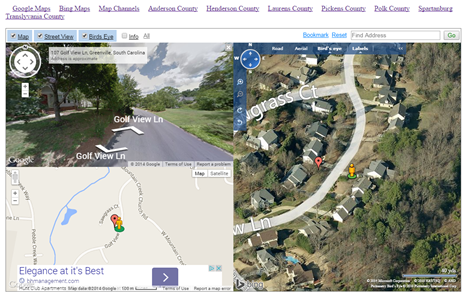
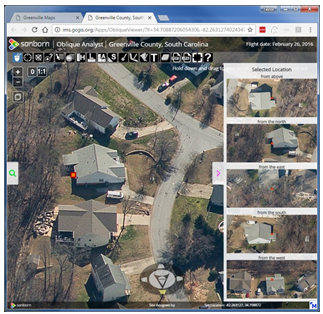
- Oblique Photos – Opens a new browser window containing oblique “Bird’s Eye” imagery with alternate
views of the selected parcel.
- Community Info – Assembles information describing the "Community" surrounding a specified location
on the map; in this case, the selected tax parcel. The Community Info tool returns a list of descriptive information for the
following categories: Tax Parcel, Zoning, City Limits, Flood Zones, Voter Information, Public Safety, Schools, Places of Interest, and Geodetic
Survey Control. Click on the “plus” icon to expand a category and display details. Optionally, click the Print button to
produce a paper copy of one or more expanded categories.
- The detailed, descriptive information for a single parcel contains links to additional information. Links are displayed as blue text, like the
optional tools described above.
- Deed Book and Deed Page link to deeds and Plat Book and Plat Page link to plats on the Greenville County Register of Deeds website. Documents recorded after January 1, 1985 may be accessed directly by clicking on a link. Links to documents recorded prior to 1985 will display the Register of Deeds archive page for either deeds or plats. The books shown on the archive pages may be searched manually to locate the deed or plat page of interest.
- Tax District, links to the current millage sheet.
- Land Use, links to descriptions of the Real Property Land Use Classifications.
- Selecting an individual record activates the tools mentioned above, plus an additional tool called Sales Search.

Clicking the Sales Search tool runs a preconfigured query that identifies properties with sales characteristics that are similar to the currently selected property. The conditions of the query are displayed and the map refreshes, zooming to the selected parcels and highlighting them in yellow. If desired, the conditions of the query can be changed in the sales search dialog. This is explained in detail on the Sales Search page, under the Residential Sales Search Example. - Table View – described above, displays descriptive details of the selected parcels in tabular format.
- Export – creates a CSV file of the selected parcels for download and viewing in spreadsheet software such as Microsoft Excel.
- Clear – clears the selected records for the Sales Search.
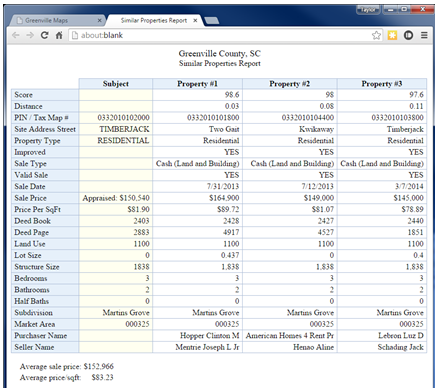
- Report – creates a Similar Properties Report that displays the descriptive details of the three properties that most closely
match the characteristics of the original parcel, along with the Average Sale Price and the Average Price/ SqFt.
Properties can be added to, or removed from, the Similar Properties Report by selecting or unselecting records. The three properties that most closely match the original parcel are selected by default and are indicated by a green check icon.
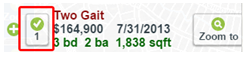
Click the green check icon to unselect a record, and click another record to select it.
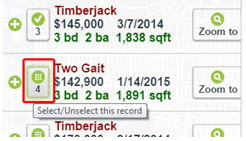
The Similar Properties Report can only contain up to three records. If more than three records are selected, the Report button will be greyed out and cannot be clicked.
The report can be printed by right clicking in the window, and then clicking print, or by clicking print from the browser menu.
Clicking the Details button displays a list of selected records with some basic information (Site Address Street, Sale Price, Sale Date, Number of Bedrooms and Baths, and Structure Size) immediately available.

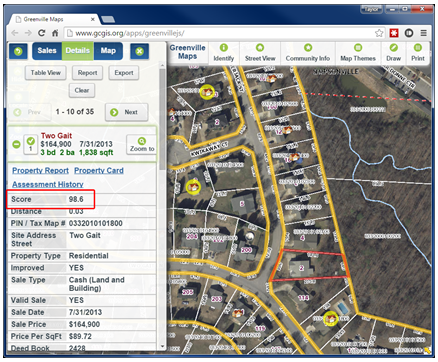
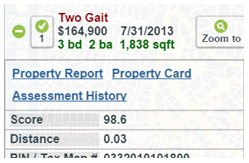
The first three records in the Details pane indicate three properties that most closely match the characteristics of the originally selected parcel. How well the properties match is based on a score which can be viewed by expanding a record (clicking the green plus icon). The three closely matching properties are represented on the map with a house icon in a yellow circle. The originally selected parcel is highlighted in red.
Several tools are now active and available to operate on the selected set of parcels.
Expanding a single record activates additional, optional tools applicable only to tax parcels. These tools, Property Report, Property Card, and Assessment History, are described in detail in the Tax Parcel Search Example. Click on any of the three links shown in blue text to run a tool.
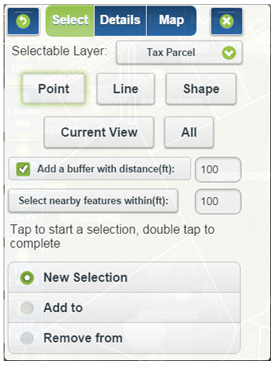
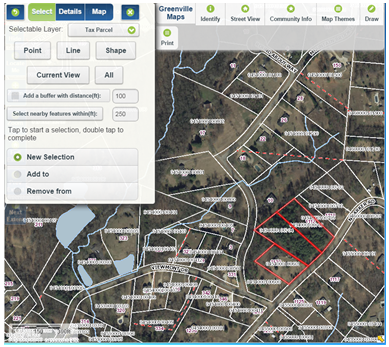
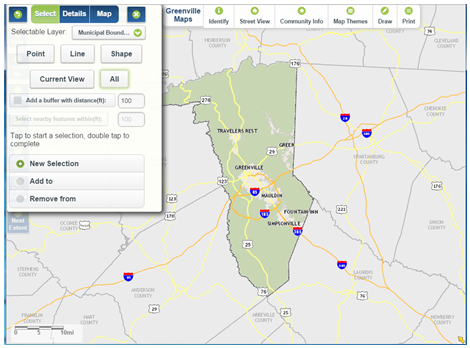
Select map features within the Selectable Layer by pointing, drawing a line, drawing a shape (polygon), using the current map view extent, or selecting all features. Features may also be selected using a buffer distance and may be added to or removed from a currently selected set.
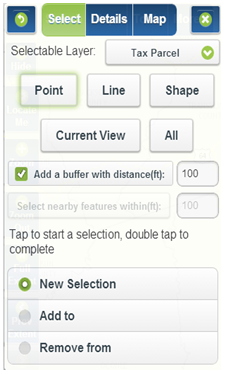
To begin, zoom-in to the area of interest on the map, click Search on the main menu, and Select on Map from the drop down. On the Selectable Layer drop down menu, select the data layer of interest. The Tax Parcel layer is the default.
- Left click on the Point button.
- Drag the mouse pointer to the feature of interest in the map and left click. The selected map feature is highlighted in red and descriptive details
are displayed in the Details pane.
- Left click on the Line button.
- Drag the mouse pointer to the feature or features of interest in the map and left click the beginning point of a line.
- Drag the mouse pointer and left click again to add a vertex to the line.
- Continue to drag the mouse and left click until the desired length and shape of the line is achieved.
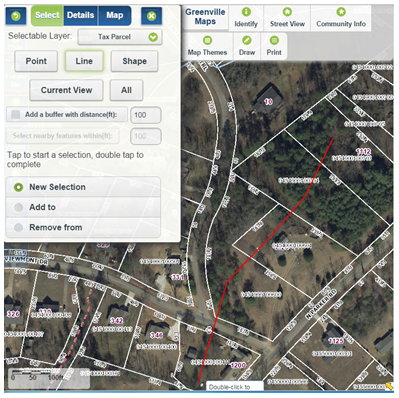
- Double click to finish the line and select the intersecting features. The Details pane will display the selected records and
the map will highlight the selected feature(s) in red.
- Click on the Shape button.
- Drag the mouse pointer to the feature or features of interest in the map and left click the beginning point of a shape.
- Drag the mouse pointer and left click again to add a vertex to the shape.
- Continue to drag and left click the mouse to construct a shape which intersects the features to be selected.
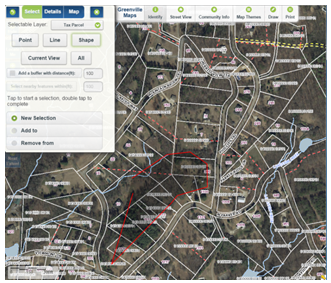
- Double click the mouse to close the shape and select the features.
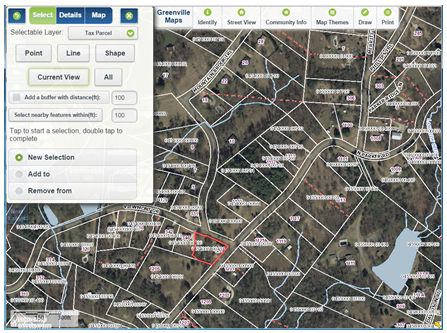
In addition to selecting only the features that intersect a point, line, or shape drawn on the map, features within a specified buffer distance may also be included in the selected set by checking Add a buffer with distance(ft): and selecting or entering a distance.
In this example, the center parcel of the three outlined in red is selected by drawing a Point. The two parcels on either side, within 100 feet of the location of the point, are also selected. The same buffering procedure may be applied when selecting features using lines or shapes.
If one or more features in the Selectable Layer are currently selected, then the button, Select nearby features within(ft):, becomes active. Specify a distance and click this button to select nearby features.
In this example, parcels within 250 feet of the three originally selected parcels are now selected and presented in the Details tab.
- Zoom to the area of interest on the map.
- Click the Current View button.
- All features in the Selectable Layer and in the current map view (maximum of 1000) will be selected and highlighted in red.
- Click the All button to select all features in the Selectable Layer (maximum of 1000).
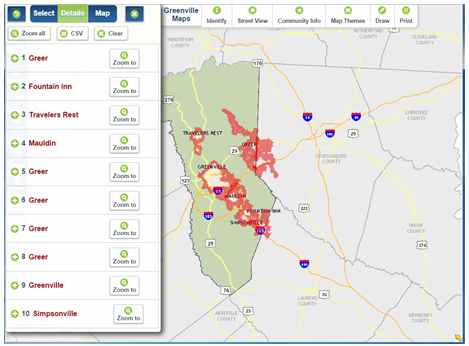
The All option is intended for feature layers containing less than 1000 records. Using this option for large data sets, such as tax parcels, may produce unexpected results.
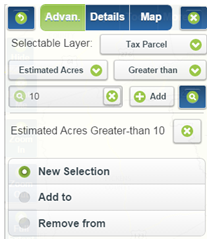
The Advanced Search tool provides a mechanism to select, add to an existing selected set, or deselect map features within a single data layer using multiple criteria and a set of standard query operators.
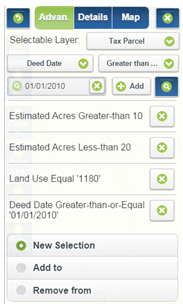
In this example, the requirement is to identify tax parcels that are between ten and twenty acres in size, are classified by the tax assessor as vacant-residential, and have been sold since January 1, 2010.
- Click on Search from the main menu and then click on Advanced Search from the drop down.
- The query will consist of a set of statements, each statement reflecting a single criterion from the requirement above. To begin, select
Tax Parcel as the Selectable Layer.

- To find parcels greater than ten acres in size, select Estimated Acres as the query field, Greater Than as the query operator, and
enter 10 as the criterion. Click the Add button to add the statement to the query box.
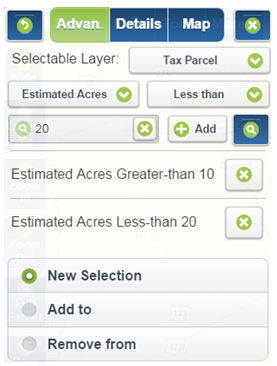
- To find parcels less than twenty acres in size, select Estimated Acres as the query field, Less Than as the query operator, and enter
20 as the criterion. Click the Add button to add the statement to the query box.
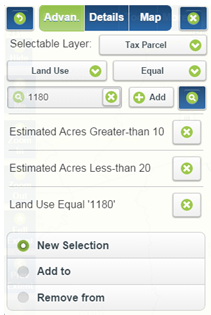
- To find parcels classified as vacant-residential by the tax assessor, select Land Use as the query field, Equal as the query operator,
and 1180 as the criterion. Click Add to add the statement to the query box.
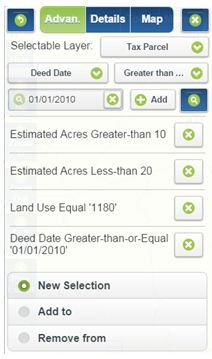
- Refine the search further by limiting the search criteria to parcels that have been sold since January 1, 2010. Select Deed Date as the query
field, Greater Than or Equal as the operator, and enter 01/01/2010 as the criterion. Click Add and then click the query
icon
 to run the query.
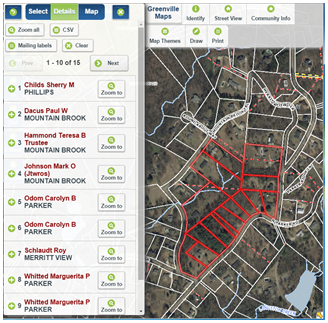
- The first ten records of the 103 selected are displayed as a list in the Details pane and all 103 parcels are highlighted in red on the map.

- The Zoom All, CSV, Mailing labels, and Clear tools are active, just as they are using Search or Select on Map. Each selected record may be expanded to display descriptive details and may be “zoomed to” for closer inspection.
- To modify the query, click the Advan. button to return to the query builder.
New query statements may be added, existing statements may be removed, and the selection type can be changed from New Selection to Add to or Remove from.
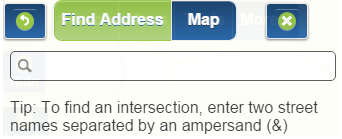
The Find Address tool provides a mechanism for finding a location using an address or an intersection of two streets.
Find an address
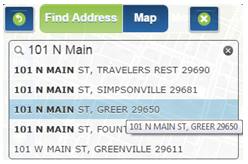
To begin, click in the empty search box and begin typing an address. The search engine uses predictive text to find and display records as the search string is entered. For example, the complete address, 101 N Main St, Greer 29650, is returned after typing “101 N Main” and can be selected from the list with a mouse click or by scrolling down with the arrow keys and pressing enter on the keyboard.
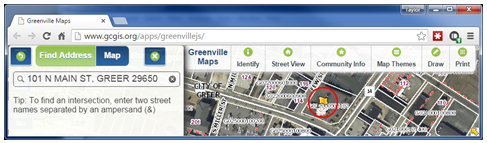
When the result is selected, the map will zoom to the address, the location of which is indicated by a flag icon.
Find a street intersection
To begin, click in the empty search box and type one of the street names of the desired intersection. Follow this with an ampersand (&) and then the other street name. Street prefixes, suffixes, and types aren’t necessary and the text is not case sensitive. For example, to find the intersection of East North Street and North Pleasantburg Drive, simply type north & pleasantburg. If a valid intersection is found, the result will display below the search box and can be selected with a mouse click or by scrolling down with the arrow keys and pressing enter on the keyboard.
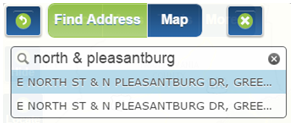
In the above example, two results are returned because the intersection is located at the junction of two zipcode boundaries.

When the result is selected, the map will zoom to the intersection, the location of which is indicated by a flag icon.
The Sales Search tool provides a mechanism for identifying and locating properties with similar sales characteristics which include: Property Type, Location, Structure Size, Lot Size, Number of Bedrooms and Bathrooms, Market and Sales Price, Sales Date, and Valid Sale.
In this example, the requirement is to identify residential properties that share specific characteristics and are within a mile of the intersection of East North Street and North Pleasantburg Drive. The criteria for the properties include the following:
- Structure size between 1100 and 2000 square feet.
- Lot size between 0.5 and 1 acre.
- Two to four bedrooms.
- One to three bathrooms.
- Sold within the last four years.
- Is a valid sale.
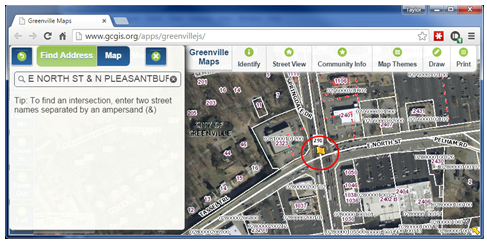
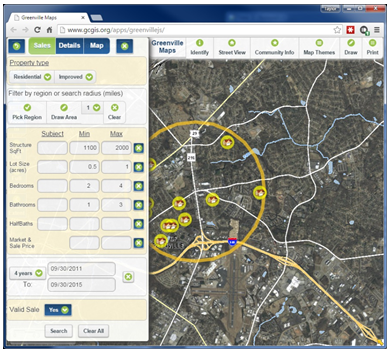
- For the Sales Search results to be constrained to a specific area, that area must be displayed in the map extent. For this example, the results are to be constrained to the area surrounding the intersection of East North Street and North Pleasantburg Drive. To do this, click Search from the main menu and then Find Address from the drop down. Click in the empty search box, type north & pleasantburg, and click on one of the two returned results to zoom to the intersection of E. North St. and N. Pleasantburg Dr.
- Click the green X button to close the Find Address tool, click Search again and click Sales Search to open the Sales Search tool.
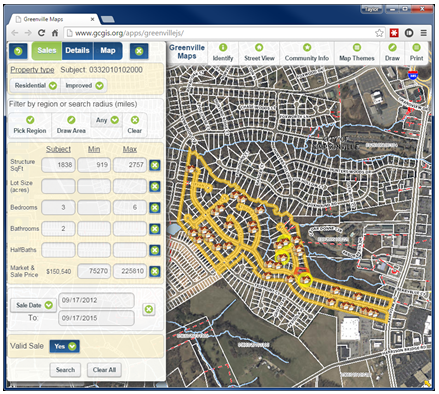
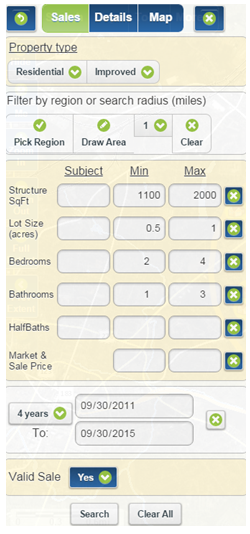
- The default Property type is Residential and Improved. For this example, we’ll leave the defaults unchanged. In the Filter by region or search radius (miles) section, click the button labeled Any and choose 1 for a search radius of one mile. In the Structure SqFt fields, enter 1100 under Min and 2000 under Max. In the Lot Size (acres) fields, enter 0.5 under Min and 1 under Max. In the Bedrooms fields, enter 2 under Min and 4 under Max. In the Bathrooms fields, enter 1 under Min and 3 under Max. The default Sales period is three years. Change this to four years by clicking the Sale Date button and choosing 4 years. The default for Valid Sale is Yes, which we’ll leave for this example. The results should look like the image below.
- When the Sale Date is changed to 4 years, the map will refresh and all properties that fit the above criteria will be indicated as a yellow circle with a house icon.
- Click the Details tab to see the records of the selected properties. Several tools, which are described on page 31, are available to operate on the selected set of properties.
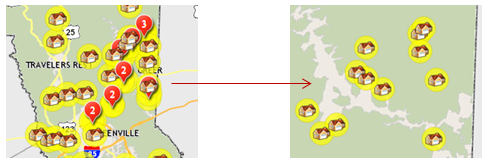
Note that, depending on the number of records returned, you may see a red bubble with a number over some of the icons in the map. This indicates a cluster of properties that match the criteria. The cluster indicator is based on the map extent and the number will change, or disappear, as you zoom-in to the area with the cluster.
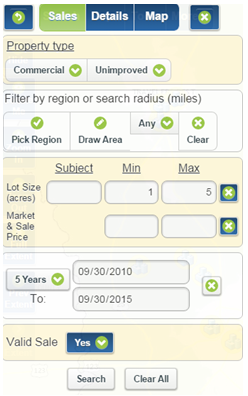
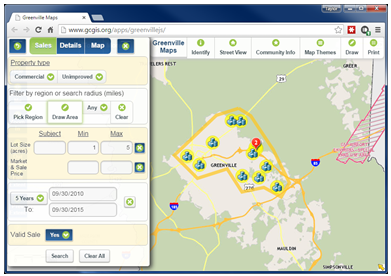
In this example, the requirement is to identify unimproved commercial properties that share specific characteristics and are near, or inside, the Greenville City limits. The criteria for the properties include the following:
- Lot size between 1 and 5 acres.
- Sold within the last five years.
- Is a valid sale.
- Click Search and then Sales Search.
- Under Property type, click the Residential button and choose Commercial then click the Improved button and choose Unimproved. In the Lot Size (acres) fields, enter 1 under Min and 5 under Max. Click the Sale Date button and choose 5 Years. The default for Valid Sale is Yes, which we’ll leave for this example. The results should look like the image below.
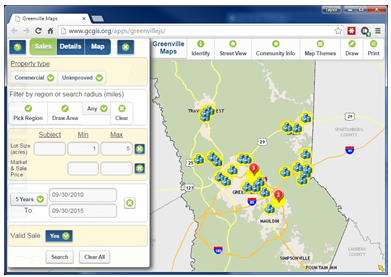
- When the Sale Date is changed to 5 years, the map will refresh and all properties that fit the above criteria will be indicated as a yellow circle with a building icon.
- To constrain the results to an area near, or inside, the Greenville City limits, click the Draw Area tool in the Filter by region or search radius (miles) section. It may help to zoom-in to the area where the Draw Area tool will be used. Click once on the map to start the Draw Area tool, click again to change direction, and double click to finish drawing around the desired properties.
- When the Draw Area tool is finished, the map will refresh with an orange polygon surrounding the selected properties.
- Click the Details tab to see the records of the selected properties. Several tools, which are described on page 31, are available to operate on the selected set of properties.
Property Type
-
Additional property type search options include Multi-Family, Mobile Home, and the option to search
for Any property type. The search result icon for each property type is displayed below.
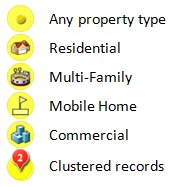
Improved - refers to a property with a building or other development on it.
Unimproved - refers to a property with no building or development.
Filter by region or search radius (miles)
-
An additional option, not described above, is Pick Region. A Region refers to the Market Area the property is in.
The Clear button clears a filter on the selected records.
Valid Sale
-
Yes - also referred to as an Arm’s Length Sale. Is the comparable sale a Valid Sale? To determine if the sale is valid, the
conditions of the transaction must meet ALL of the following criteria. If one item is answered "no", the Assessor will likely discount the sale.
- Was conveyance via a Warranty Deed or Trustee's Deed?
- Were all parties knowledgeable of the market?
- Were all parties able to make an informed decision without undue influence?
- Was the property exposed to the open market?
- Were the principal buyer and seller unrelated individuals or corporations?
- Were all parties NON-GOVERNMENTAL agents or agencies?
- If the sale was a foreclosure, was it the first sale after the foreclosure preceding (an REO)?
No - Conditions of an Invalid Sale or Non-Market Sale. A sale is considered invalid if it meets ANY of the following criteria. If one item is answered "yes", the Assessor will likely discount the sale. Please note the below criteria are the most common reasons to exclude a sale from comparison. Exclusions include, but are not limited to:- The transaction involves a government agency
- Multiple parcels are sold in the same transaction
- One parcel is being divided into multiple parcels or multiple parcels are being combined
- Individuals or corporations have same name or ownership
- The sale is mandated by the court (lender possession, divorce decree, interstate, etc.)
- Only a portion of the parcel or partial interest is transferred
- Parcels are traded
- A deed other than a Warranty Deed or Trustee's Deed is used to convey the parcel
- The property was not exposed to the open market
- Property was sold at auction
- Adjacent neighbor is principal to the transaction
- Agreement for Deed or Option to Purchase
- Sale-Leasebacks
- Transfers in payment of satisfaction of a debt